Braised Short ribs + fried green tomatoes? Sounds disgusting right? Well, not exactly. Granted, I didn't start out to make this dish, but when I went the farmer's market, my usual farmer wasn't there, and no other produce looked good except the green tomatoes. Since I was already dead set on making short ribs (in fact they were already braising at home), I had to think of something and this is what resulted.
I promise that it actually turned out well. There was a nice acidity in the green tomatoes that counterbalanced the richness of the braised short ribs.
Short ribs are one of the easiest cuts of beef to make and you can pair them with lots of good stuff. The beef I used was pasture-raised (and dry-aged 30 days) and came from the Whippoorwill Farm in Lakeville, CT. If you are anywhere near CT, it's worth the drive to see their farm and pick up some of their beef. They also smoke their own bacon! I mean, FRESH FARM BACON! How awesome is that.
Now, onto the recipe...
The first thing you have to do is to trim the short ribs. Short ribs usually come in one of two cuts; English cut or flanken cut. In English cut the bone is long and the meat follows along it (think traditional ribs). In flanken cut, the cut is a cross section of a few bones which means once you get the ribs home it's easier to cut yourself. My short ribs where flanken cut ...
I then proceeded to slice the ribs between the bones to make nice portion sizes. This will help browning and braising because it's easier to completely cover the ribs with wine. Otherwise your kitchen is going to look like something out of a horror movie with a big pot and all these bones sticking straight out of bubbling liquid. But hey, if your goal is to freak out the neighbors, go ahead and invite them over...
Here's the portioned shortribs...

See all that juicy fat? Yes, juicy fat. That's one great thing about short ribs. First, they generally have much more meat than regular ribs, and that meat is more unctuous. Don't worry, a lot of this fat cooks off in the searing and braising. It's there to act like an insulator and provide flavor. If it doesn't melt away in the cooking, or you can pull the meat off the fat at the end.
Next, I browned them in a very hot pan. This is the same pan I'm going to braise them in and I was looking for a fairly thick brown crust. You don't want to burn them, but you want to give this step the attention it deserves because this is where a lot of the flavor comes from. I'd say I probably let them brown for around 15-20 minutes total on all sides.

I didn't crowd the pot either. If you crowd it, then the meat will end up steaming instead of searing. Therefore, I did the browning in two step, or I could've used two pans.
Once I put them in the pan, I let them sit there. I didn't touch them for a long time, around 4-5 minutes.
Here's what the look like after browning...
Next, I added some chopped red onion, carrots and whole garlic cloves and let them brown.
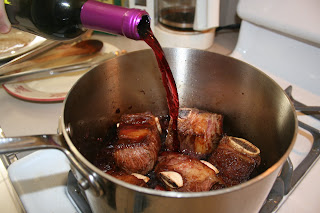
 After the vegetables were sufficiently browned, I deglazed the pan with about a cup of red wine and scraped up all the bits of fond (the brown bits on the bottom of the pan). Then I added the seared short ribs and covered it with red wine.
After bringing it to a light boil, I threw in about 10 black peppercorns, 2 whole star anise pods (I love beef+star anise) and about 10 coriander seeds.
Then, I put a lid on it and put the pot in a 310 degree oven for around 3.5 hours.
After 3.5 hours, I took the short ribs out and strained the braising liquid into a skillet. I then let the braising liquid reduce, added some kosher salt and a few springs of thyme. While the liquid was reducing, I made the tomatoes.
Sadly I don't have any pictures of making the fried green tomatoes, but all I did was dip each slice in a mixture of fine ground cornmeal with cayenne pepper. I then fried them in a skillet for about 2 minutes on each side.
After placing a couple of green tomatoes slices on a plate, I topped it with the braised short ribs, and then swirled in some butter to the braising liquid. I spooned this sauce around the plate.
There was more short ribs than we could eat in one sitting, so the next day I made a short rib ragu with the leftovers. Reduced tomatoes + leek+garlic+red wine+short rib until a thick sauce was amazing on top of homemade pasta. I topped it with a bit of goat cheese and it was heavenly...


